Friday, 16 April 2010

Garden

This is a render from yesterday.
Note: theres is only one huge spotlight in this scene.

Im pretty much sitting with a bunch of Gruffalo screencaps infront of me trying to capture the same colour palette as they used, seeing as its been our biggest influence on this project.

Im really quite pleased with the fences - they've turned out better than i thought they would.

I've still got to bump map the grass and the dirt and im a little worried about the edging where the grass and dirt meet, its too harsh and makes the grass look like water. I thought about maybe a short level of grass skirting around the edge, but this would be quite a lengthy a boring thing to do so i dunno. I might just see if indenting the edge makes a difference, it seems to have worked were the fences and dirt meet.

Annoyingly over the last day or so an couple of files have corrupted and i need some stuff -
UV'd Flowepots + Wheelbarrow (got off Sarah this morning)
UV''d Tree Stump (wasn't with the rest of the props)
All the bushes and leaves.
Mushrooms (apparently still being UV's)

Texturing

Right, am taking a week off of the animating to get some texturing done.

I spent a coupla of day s fiddling around with macho textures and getting them done using Maya's Fast skin.I really quite like maya fast skin and was planning to push it useage as much as i could for this project, but during mondays meeting with Sarah and Dan it was decided that using the fast skin
to texture our characters wasn't really a viable option. Although it looks really good its a very fiddly process that isnt very user friendly so its getting dropped so we can spend more time perfecting other elements, sometimes its a real pain that we don't have more people working full time on Gnomes, ah well.

Friday, 9 April 2010

As requested

Right this is shot 32 as of 12.15(am) friday morning.


Its ok-ish up until a point, the struggling to keep the weight up is working really well, but the lift from crouching needs work done to it, cuz at the mo' he just... does it, then stand stationary for about 15 frames.

I dont like the smile i have him doing at the end, it isn't expressive enough and looks generally bad and i might make the eye twitch a bit more subtle - make it look like its a small detail that supposed to go unnoticed...but still catches everyones attention.

Also need to bring the pot down further on his head before he starts lifting to add more weight cuz it looks too floaty.

Things to note -
Having him holding the flowerpot above his head in both hands is a right pain in the arse, its easy enough parenting the pot to one hand but matching the movement with the other arm has led to no end of grief, and has taken a ridiculous amount of time to get looking only half decent.

The flowerpot was WWWAAAAYYYYY too small and i've had to scale it up to fit Macho inside...should be okay though...i hope....

The flowerpot crash looks REALLY bad without the sound or dust, i did add some camera shake to it at one point, but then realized that if we're gonna be adding dust effects in AE then it wouldnt be possible to have the camera shaking, so i got rid of it...and its boring again

Found a couple of problems with the blendshapes as well. Namely that he doesn't like to look up with his eyes - simple solution is to not have him look up. I wouldn't say that the animation has suffered any and am not sure whether its worth taking the time to fix or just keep cracking on until its a proper issue.

Lemme know your thoughts on the animation. And also lemme know if we're gonna break into uni on Sun to get some texturing done (i've studied the layout and think i've found away around the security alarm).

Tuesday, 6 April 2010

The first incomplete animations.

Both of these are works in progress.


Animating has only in the last two days started running relatively smoothly. Being the first piece that I've animated in about a year i took me a couple of days to remind myself on how things worked - "Ah! The Graph Editor! I remember that."

The first couple of pieces i created were truly terrible so this is about the 4th time I've animated scene 3 and i got a bit bored of doing it, so i decided to apply my now refreshed (though limited) animation knowledge to one of the other scenes and go back to scene 3 in a couple of days.

I've started using video referance properly for the first time and i can't believe that i havn't used it before. Its been immensly helpful with posing and arcs, and in real life you do things thats you would never think to add off the top of your head.
For example when i was filming myself weight lifting for referance everytime before i lifted the weights i would do something to loosen up my muscles, whether it was shaking my hands off or stretching my neck to one side it was a involuntary movement that i never would have clocked to add to the scene. These little details - although a pain to add in - are what makes good animation and really brings your characters to life.

Although this did lead me down the side route of being overly ambitious, I ended up thumbnailing and trying to add all kinds of slouches, jumps and stretchy/yawn hybrids to the movement until 2 days later it dawned on me that i only had about 110 frames to animate the scene and far too much happening. So big cut back and now he just has a quick arm shake to loosen up as he's moving towards his rocks (don't look for it, it ain't done yet.)


This shot (4) is alot closer to completion, i've got a couple more elements to add to it before i feel its been done to a reasonable standard, no more than 2 hours work, spoke to Dan Dahli today and he commented that the timings need to be a bit more uneven to add weight to the movement - something i completely agree with - but due to the ever pressing time restrictions i'm going to leave this for today and make a start on shot 32, which is one of the harder shots and is probably going to need some more time spent on it.

Edit - Just noticed the timing on his bounce (shot4) are off kilter to the weight lifiing....bugger.

Wednesday, 31 March 2010

Finally after all of these months of story development, character modelling and rigging i get too animate something!!!SON OF A -

Thank God 2010 allows you to scale rigged characters.

Righty....2

Just got back from a sound meeting with Pip and Sarah and before i started animating, i thought it would be better to do a quick summary of the last couple of days.

Painting weights was a quicker process than i thought it would be but it took me longer to finish than i thought it would. I'm really quite pleased with how alot of it has come out, the body im particulaly pleased with because by adding extra bones to distribute the weight in his face and belly we have managed to achieve no rippling in his mesh when he moves around despite the fact that he's quite a chunky character.
If you dont know what im talking about when I say rippling have a look at my model from the second year - Bungo
You see how the belly is folding in on itself underneath his chest, when this is moving it looks REALLY bad, the character looks more like their made out of taffy than actual flesh (or in Machos case rock).

There are a couple of areas that im not entirely confident about, the arms and the legs required (as far as i could tell) minimal intervention from me after the smooth bind, so i expect that i'll start spotting problems when im animating, this shouldnt be too much of an issue though because with painting weights you can fix it on the model there and then.

* * * * * *

I wasted much of monday trying find a way to get multiple blendshapes setup on a 2d facial control panel. The only answer i found was in the book Stop Staring, however they used quite a lengthy process that revolved around their own mel script tools which for some reason refused to work in 2010.

After a quick whine to Sarah, she collared Edgely who was kind enough to share his prcoess using set driven keys, which worked like a dream, after that it only took me a couple of hours to get the facial control panel setup. So cheers for that Edge.

There were a couple of errors with the blendshapes not merging together as well as they should be and i've spent a couple of hours cleaning them up as best i can, but their still not perfect. However the deformations are barely noticeable and are only occuring when the blendshapes are at their most extreme (positions that probably arn't going to be used) , so for the sake of time management im going to leave them for the time being and see how we get on.
I'm going to be keeping a VERY close eye on them though and if their causing too much trouble its something that will need to be adressed, but we shall see.

Friday, 26 March 2010

Skinning Update

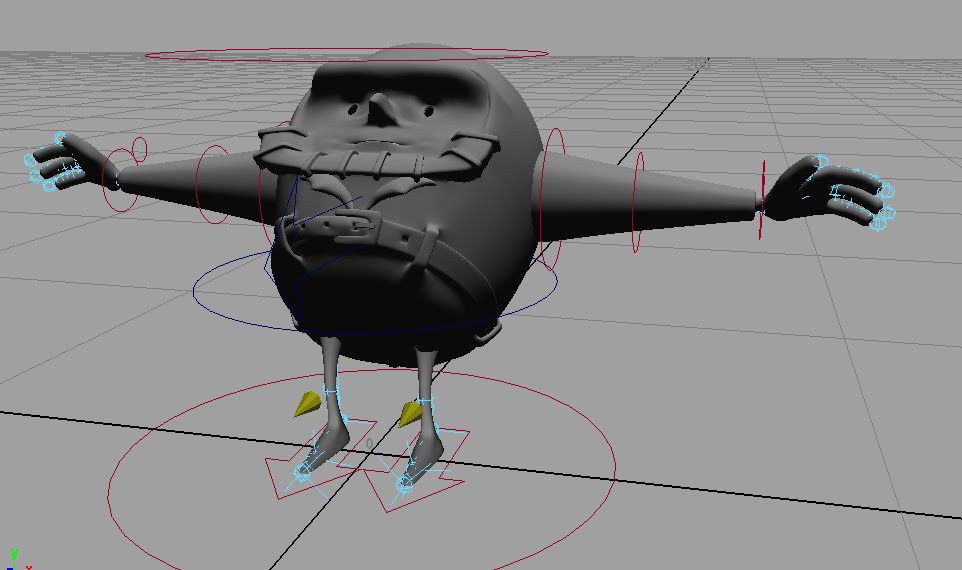
There was only two changes i had to make to Sarahs rig and only in the body the arms and legs are fine (the hands set driven keys are AWESOME!). I added two more joints to distribute the weight on the face and belly to help keep their shape as he's turning and stretching and reshaped the "ribs" he was given (looking back maybe not nesessary but it make things simpler).
The second thing was more of an error than anything. For some reason on the file i recieved the IK spline put in his spine was inverted. So when you told him to lean forward he would lean back.
There was also an issue of the skin constraints relying on the global co-oridnates which prevented the creation of a master control. And unfortunatly in the end i figured it would be generally easier to simply get rid of it - if necessary we can add one back in once the skin is weighted.

All that said the rig layout is incredibly astute and makes my life of weighting it a hell of alot easier. Got most of the weighting done on thurs and am now spending friday simply fine tuning it.

You can really see it too well but that is body twist. I've also got the face setup so it can move ontop of the body slightly so if we need to emphasize him looking at something, sighing, straining etc we can use this subtly to emphasize the movement.


I just need to level out the weights a bit more so it can squash a little more without pinching, do a bit more work on his collar(i thought it was working yesterday but it clearly isnt) go over his arms and legs with a fine tooth comb and make sure they're working well and then hes pretty much done. All that needs doing after that is to make a few changes to the blendshapes and create a facial control panel and hes ready for animating.

You may also notice that a couple of the nurbs circles don't follow the rig. This is because of some reason i can't get the parent script to work for me, all it does is create a dublicate nurbs circle with both circles are parented to each other, instead of parented to the rig.