Wednesday 31 March 2010

Finally after all of these months of story development, character modelling and rigging i get too animate something!!!SON OF A -

Thank God 2010 allows you to scale rigged characters.

Righty....2

Just got back from a sound meeting with Pip and Sarah and before i started animating, i thought it would be better to do a quick summary of the last couple of days.

Painting weights was a quicker process than i thought it would be but it took me longer to finish than i thought it would. I'm really quite pleased with how alot of it has come out, the body im particulaly pleased with because by adding extra bones to distribute the weight in his face and belly we have managed to achieve no rippling in his mesh when he moves around despite the fact that he's quite a chunky character.
If you dont know what im talking about when I say rippling have a look at my model from the second year - Bungo
You see how the belly is folding in on itself underneath his chest, when this is moving it looks REALLY bad, the character looks more like their made out of taffy than actual flesh (or in Machos case rock).

There are a couple of areas that im not entirely confident about, the arms and the legs required (as far as i could tell) minimal intervention from me after the smooth bind, so i expect that i'll start spotting problems when im animating, this shouldnt be too much of an issue though because with painting weights you can fix it on the model there and then.

* * * * * *

I wasted much of monday trying find a way to get multiple blendshapes setup on a 2d facial control panel. The only answer i found was in the book Stop Staring, however they used quite a lengthy process that revolved around their own mel script tools which for some reason refused to work in 2010.

After a quick whine to Sarah, she collared Edgely who was kind enough to share his prcoess using set driven keys, which worked like a dream, after that it only took me a couple of hours to get the facial control panel setup. So cheers for that Edge.

There were a couple of errors with the blendshapes not merging together as well as they should be and i've spent a couple of hours cleaning them up as best i can, but their still not perfect. However the deformations are barely noticeable and are only occuring when the blendshapes are at their most extreme (positions that probably arn't going to be used) , so for the sake of time management im going to leave them for the time being and see how we get on.
I'm going to be keeping a VERY close eye on them though and if their causing too much trouble its something that will need to be adressed, but we shall see.

Friday 26 March 2010

Skinning Update

There was only two changes i had to make to Sarahs rig and only in the body the arms and legs are fine (the hands set driven keys are AWESOME!). I added two more joints to distribute the weight on the face and belly to help keep their shape as he's turning and stretching and reshaped the "ribs" he was given (looking back maybe not nesessary but it make things simpler).
The second thing was more of an error than anything. For some reason on the file i recieved the IK spline put in his spine was inverted. So when you told him to lean forward he would lean back.
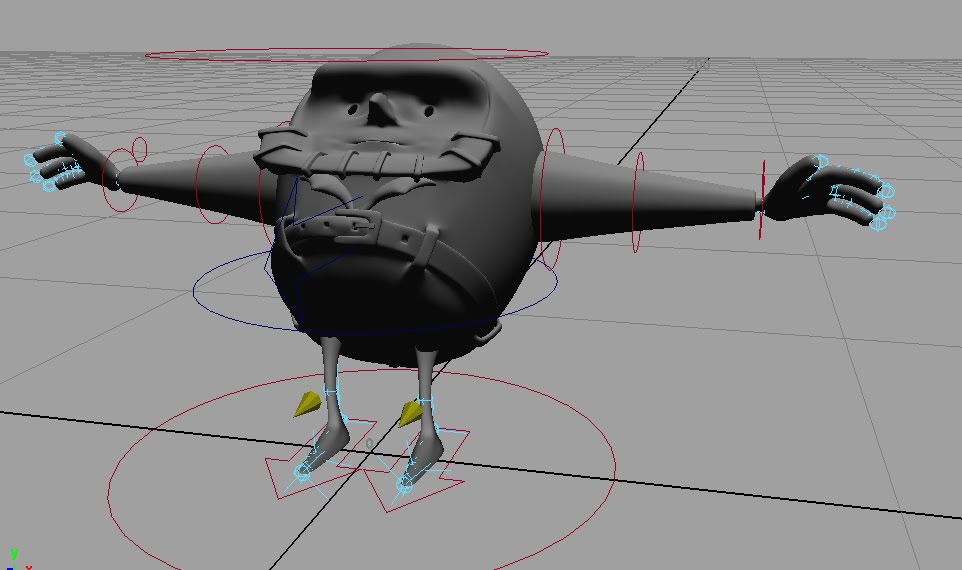
There was also an issue of the skin constraints relying on the global co-oridnates which prevented the creation of a master control. And unfortunatly in the end i figured it would be generally easier to simply get rid of it - if necessary we can add one back in once the skin is weighted.

All that said the rig layout is incredibly astute and makes my life of weighting it a hell of alot easier. Got most of the weighting done on thurs and am now spending friday simply fine tuning it.

You can really see it too well but that is body twist. I've also got the face setup so it can move ontop of the body slightly so if we need to emphasize him looking at something, sighing, straining etc we can use this subtly to emphasize the movement.


I just need to level out the weights a bit more so it can squash a little more without pinching, do a bit more work on his collar(i thought it was working yesterday but it clearly isnt) go over his arms and legs with a fine tooth comb and make sure they're working well and then hes pretty much done. All that needs doing after that is to make a few changes to the blendshapes and create a facial control panel and hes ready for animating.

You may also notice that a couple of the nurbs circles don't follow the rig. This is because of some reason i can't get the parent script to work for me, all it does is create a dublicate nurbs circle with both circles are parented to each other, instead of parented to the rig.

Wednesday 24 March 2010

His Mother Loves him.....

Update....once again its been a while.

Right lets recap on the problem we was having with our textures, and that they were stretching. we had a short meeting with Alex Hulse and he agreed that whilst projecting the textures was a solution to the problem it wasnt one that he recommended because the textures on the face would appear to be free flosting and any movement would thus look horribly unnatural. So he advised us to simply add more geometry to our model and space out the verts so that there was less stretching on the textures, which is the process we have adapted and so far its working well, so cheers for that Alex.

I've scaled the UV textures, and done some layout and colour tests on Macho and thats all sorted now, so its pretty much just need to create Macho's final textures and apply them, which hopefully wont take too long.

Aaaaand i've just completed Macho's blendshapes.
37 in all, and most of that is down to his eyebrow which has 14 blendshapes to itself.

Going to spend a couple of hours now doing a quick test animation to see that they are working well together and highlight any changes that need to be made, will try to get that done today and have it uploaded either today or tommorow.

Tuesday 9 March 2010

Right i have a working solution...but it isnt going to be fun

I'm about mid way through testing this process and its working so far.

Basically we create a kind of frankenstein monsters out of our gnomes using textures.
Theres two ways in which you can texture something...Using UV mapping or Projecting.

We all know what UV mapping is, Projecting is simply that, you create a placed3d texture which instead of laying ontop of the mesh of you model projects onto it.
Because projected textures are...projected and arn't part of the model you can move the verts around as much as you please and the textures don't move.

So the way that we get it working is we have the blendshaped sections of our models as projected textures and the rest of it UV'ed.
IEIts in no way ideal and i havnt tested to see if its going to work well - unless the textures are done pretty perfectly it might be glaringly obvious that they done match...and im not sure how we're goin to line up the projection with the UV's...so alot of plotholes(the more you look at it the more you see) If another solution comes up we'll probs drop this idea...but its something at least.

Monday 8 March 2010

Update

Right, been working on this problem for about 6 hours now.....and I've gotten no-where.

I have proved several things to myself though:

Its impossible to remove a verts influence on a UV.
Its impossible for a blend-shapes UV's to effect the Primary model.
Projecting a texture onto the character mesh isn't going to work. (which throws doubt into animated textures for eyebrows)
Animating the UV's isn't going to work
Transferring UV attributes from an unmodified model isn't going to work

I'm really stumped by this and can't think or find any other leads as too what to do next.

1 hour later :OK there IS more thing to try that I've just thought of using blend colour nodes but if that doesn't work i really am stumped. Will try it in 'ze mornin

Horrible glaring problem

Our eyes don't work with the textures...You remeber the test i did with the eyebrows today (the one where the blendshape was effecting not only the painted brow but the surrounding skin) basically the same effect happens when you create blendshapes on our eyes.A quick and crude test but you can see the problem.

We could fix this is if we could somehow lock the UV co'ordinates(around the eye) or somehow detach their connection from the verts (not even sure if this is possible).

Really not sure what else to suggest because its not only the texture thats effected but the bump map as well. So even if we (god forbid) were to have their faces as one stagnant skin colour the bump would still deform.

Really stumped....

Any ideas???

I'm either stupid or...not

A probably stupid scenario but one that has been bothering me for a while.

You can blendshape using groups! I think i remember Sarah questioning whether it was possible for Girls hood and it is. I was origionally gonna combine the inside of his mouth with the rest of geometry (the way i've done it in the past - cuz im either misinformed or just plain thick) but this is a real bitch to work with cuz it makes it near enough impossible to select anything without highlighting a whole bunch of verts you dont want, so takes aagggeeesss to do anything.

Couple of things to note though:

When duplicating the primary object for shaping you have to select the group its assigned to, rather than the mesh.

Something i did wrong:
You gotta name all of the shapes in your primary group mesh - before you duplicate it for blendshaping - in the outliner cuz otherwise the computer likes to start naming things itself (and boy can it be creative!) If the shape names of the objects your trying to blend don't match nothing is gonna happen. Plus it adds to the general Maya organization that we all seem to lack.


Something else i did wrong:
Now lets say you've created the group blendshapes and you wanna move the one of the shapes around (in this instance teeth). What i did at first was select the geometry of the teeth hit the trusty old "W" and move it up. Rather proudly i then created the blendshape and tested it only to have Maya stare back blanky at me.

When you make a blendshape Maya ignores the positions of your shapes, which is why you can move your blendshape meshs all over the place and not have it effect the primary, Blendshapes only effects changes in the vertex's (vertexi?) which sounds really obvious but is (according to my expieriance) really easy to overlook.
So instead of just moving the shape you have to select all of the shapes vertex's and move them.
Hope this helps a little, probably didn't, but hey.