
Monday, 31 May 2010
Something a bit more like this?
A bit rushed because i just wanna see if i have the right idea over the movement. If this (rough) movement is okay i'll clean it up and get it on Adrive.
Matts really really crappy weekend.
Im just be blunt and say it.
Shots 13, 16 and 18 all corrupted on me on friday.
After a depserate hour of me tearing my hair out and checking and rechecking practically every folder and file on my computer i managed to recover most of shot 13, half of shot 16 and none of shot 18. I also managed to find the most uptodate playblasts i had.
Needless to say my weekend has been a pretty damn depressing rush of me locked to my computer redo-ing all my work from last week.
Shot 13 is at the stage posted below. I will continue work on it when i've finished typing this and get that finished asap.
Shot 16 is at this stage.
I managed to recover all of heros movement do i just had to reanimate Lady. So its pretty Identical to what i had before.
Personally i think this just needs a bit of cleaning on her body and he blink starts a bit too soon before she turns, i want to have this done today. Feedback plz.
And shot 18 is at this stage.
Which is a bit further along than it was before it corrupted. I tried to make the spade look a bit heavier this time round, hoping to have most of this scene finished by the end of the day if not finished.
After these 3 are complete i just have shot 35 to do, which is already roughly blocked out so i have a pretty good idea of timings. So im gonna be trying to be finished with the animation by weds eve if all goes to plan and we don't have anymore crippling errors that seem to be springing out of the woodwork this week.
Sunday, 30 May 2010
Saturday, 29 May 2010
Thursday, 27 May 2010
Saturday, 22 May 2010
Hero Textured
 Hero's textures are now on the Adrive. I can tell you now that they ARN'T going to work on shot 26 as it is because the model is using the old UV layout. I'll change this and re-up the file later on tonight, this shouldn't effect the (hopefully already rendered) occlusion, z-depth etc.
Also the button/string hasn't been textured cuz they havnt been uv'd and im not too sure what to do with them.
Macho's teeth texture is now on the Adrive as well. Dependant upon what model you have you may need to Auto-Uv the teeth then apply the texture. Same texture for top and bottom.
Friday, 21 May 2010
Update
Updates on shot 13 and 16.
They're both pretty much there, will be done by tommorow eve (sat).
This is shot 13, i started work on this before i started shot 16 and got it pretty much fleshed out. Then went on to work on 16 and found a much easier way of working that solved alot of the issues when working with the fishing rods, so i've gone back over and transfered the movement onto a new file with the new work flow.
Its nearly there, the rod and the line arn't animated yet so he doesnt particulaly look like he's balancing it...more like its stuck to his fingers...which it is... but we don't want it to look like it is, i think the left hand needs a bit of refining as well, its a bit too chunky atm and doesnt reflect whats happening with the rod too well. Then all the facial stuff.
The balancing part of shot 16 is done, just need to add facial animation and then Hero is animated for this scene. I havn't started on lady yet, but its just a reactory shot so it should take too long.
Tuesday, 18 May 2010
shot 20 re-do
Re-working of shot 20 after talking to Sarah yesterday, the juggliung does look better but im not too sure about Lady's clapping.
Lemme know your thoughts.
Shot 6
The final pose is a little rushed - i ran out of frames.
Might change the look across as well cuz its looking a little too rushed for my liking.
- EDIT (2 hours later) That look across is far too fast.... will space it so he starts looking across before he turns his body.
Thoughts and feedback plz.
Monday, 17 May 2010
For God sakes somebody call a Doctor...or a Potter.
 Lady Gnome all smashed up for the final shot, which has now been animated - she blinks twice and her arm falls off. Im pretty happy with the way she turned out smashed considering it was a pretty rushed job. The white jigsawy pieces will be a slightly different colour to the main bulk of her body (which is just her plain old body) So the look like different pieces that have been stuck on. They have been manually smoothed so can't be smooth preveiwed (otherwise they loose their edge) Face has been moved around a bit and the hair has been straightened and angled to look messy. However its the tape that brings the whole thing together, for some reason it seems to add alot more to what isnt there, by applying it she just looks more...broken.
We'll also be covering the texture with cracks so it looks like she's been smashed and then she's done.
This scene (38) along with shots 23 nd 24 are now on the adrive, so rendering of their occlusions and zdepth (etc) can begin.
Saturday, 15 May 2010
...Fail?
 Currently working on shot 37 and felt inclined to show this. This was working towards something a bit more like what we have in the animatic but it juts doesn't look right.
I am quite pleased with the body though.
Edit: Ok now im not sure, i walked away and have come back to it and i'm not sure whether i like this/should continue this or not.
Thoughts
Shot 20
Shot 20 - the one that wouldnt upload last night. This ones completly ready for renderering (except the textures) The Uv's are correct, the eyes are added and the scene in cleaned. Just need the A-ok on the animation....and might lower the camera cuz there alot of sky in this scene.
Friday, 14 May 2010
Animation for feedback
Which ones are ready to be sent through to render and which ones need more work.
Im having real trouble uploading the vids here, managed to get two up but will try uping shot 20 again in the morning.
Shot 22 generally cleaned up with more added to it. Still need to switch Hero here for the re-uved one, but now ive got Hero juggling in shot 20 i can copy him in and then just have to copy over the keys on the fall. So shouldnt take as long as shot 20 did.
I know i need to add more to the movement of him lifting the rocks up to look at them.
I Wouldn't say i'm overly happy with the way that shot 8 is looking, but i'm accutley aware of the time its taking. This could look better, but ive got about a hundred other things i need to do as well.
Lemme know your opinions on all shots.
Next one im gonna work on is shot 6 which should only take me a day.
Wednesday, 12 May 2010
Bumped.
 Quick render of Macho textured with his bump map applied.
Theres two maps applied, a body bump at 0.02 influence and a universal bump for his limbs at 0.01 influence. I'll be sticking these bumps on the Adrive and the public.
I got bored of looking for the perfect rock textures online so in the end i just made one in photoshop using filters and lighting effects. Am pretty pleased with the way its turned out given that i only had a couple of hours to do it. Its a little bit funny in some places but i think this is just where i've been playing around with the lighting.
I know we didnt get all the nice longer cracks and stuff that we were origionally hopeing to add to the bump. I had a play with it last night and got some poor results, it would take me a coupla days to get working well which is time that we really dont have, so i left it like this.
Something else to note is that i have got the occlusion on Soft light instead of Multiply, because for this particular render it looks better, it's something i'd like to to look at in AE and see what it looks like on a moving scene.
And finally the Rigs need to have sphere eyeballs with a black metallic attached, they look REALLY bad without it (they have shark eyes).
 I've already setup Macho and Hero with the spheres, just need to have a look at lady (at the moment she has concave eyes so we may just get away wih painting the faces...but i doubt it) Its easy enough to attach them eyeballs though so its not really a big issue. I'll post instructions on how to get the eye texture working on the main blog shortly.
Edit:
Right, in the bump files and a final scaled body texture for Macho are on the public drive
GnomesTexture+Lighting\FinalTextures\MachoFinalBump
And are also on the Adrive in the texures folder.
Tuesday, 4 May 2010
Shot22 Progress
Right i've changed it a little bit from the animatic. Instead of falling backwards and turning so that he catches himself on his hands Hero now just falls and lands on his backside. I didnt attempt the twist but thinking about in the planning stage made me realize that such a movement would just look unnatural.
Macho's legs dont lend themselves well to a walk cycleand it tool me ages to get something halfway decent and im still working on his arms.
Heros arms havn't been animated yet and i've had to delete the stones he was juggling, but these shouldnt take to long to put them back in because its only 40-50 frames. Also I havnt done any facial animation on him yet, so at the moment he gets pushed over and just grins wider. Am planning to have this shot, along with shot 20, done by tommorow eve.
Monday, 3 May 2010
Shot20 Progress
Right, can't say i've made amazing progress over the last couple of days, ive really been struggling with the stones and the catch and grab on his hands. I am working on shot 20 + 22 at the same time and intend to have them finished by weds eve.
I know it looks pretty reptitive... i need to go back over it and add some more differences, however its not as bad as it looks here(small).
Lady is just blocked i need to get ahold of the final versions of the mushrooms to place her on, then add more to her and this shot is pretty much there (unless you can see something that needs changing) I'm not too keen on how Heros legs are looking in this shot i might see if i can crop it in a little bit.
For shot 22, i spent a couple of hours on Machos walk cycle today but looking at it again now its really terrible (he look like he's limping and his arms are terrible) so im gonna rework it now and i'll post a playblast tommorow evening.
Feedback plz
Thursday, 29 April 2010
Juggling
Progress for the juggling.
Taken most of the day to work this out, It just looks really sloppy and the balls are only roughed, but now that ive got my head round this and got something to work from it shouldnt be too bad.
Taken most of the day to work this out, It just looks really sloppy and the balls are only roughed, but now that ive got my head round this and got something to work from it shouldnt be too bad.
Shots
Right shots that i've been working on over the last coupla days for feedback.
Shot 3
I havn't added any facial animation to this yet because im not too sure whats gonna be happening with the sound, which is quite heavily involved on this shot, so i'll do more to it when i have a clearer idea of whats happening with that.
Also this starts on frame 25. I've left the first 24 frames until Macho's animated in shot 2 so i know what he's doin and where to pick it up.
Shot 24, need some feedback on this shot. Shouldnt take long to add or change anything.
Shot 4. He does have rocks in his hands but they're parented to the controls which have their visabilty turned off.
Lemme know what you think.
Onto shot 22
Tuesday, 27 April 2010


Sunday, 25 April 2010
Shot 4 issues
 Right i'm having issues with with Macho's stretch as it is in the animatic.
Macho is essentially just a giant head with arms and legs and it turns out that he can barely touch his hands together.
This is the most im gonna be able to do with this stretch, instead of pulling the arm back with the forearm like a normal person would he'll be clasping his wrist and pulling it towards his body, and im not sure whether thats gonna work. Its looking a bit too clustered and his arms keep covering his face.
Shall i continue with this or revert back to what i was doing earlier with him stretching up to the sky???
Monday, 19 April 2010
Texturing Stuff
Spent the last coupla days doin a wee bit of texturing. and its going ok-ish.
Wasted quite alot of time today playing aorund with lights wondering why my renders were contantly overexposing before realizeing the blending mode of my occlusion was set to overlay....dipstick.
Got the stump through off Sarah on saturday and found that although the stump had been UV'd properly, the bark that raps around the outside of of the stump had only been auto mapped, and so had to waste half a day mapping that out properly. But thats done now and the textures are created and just need feedback. Right comments on this. Firstly on this particular render there is no bump map, tis something that i've started working on though, for the bark in particular it'll probably only be slight cuz i really quite like the texture thats on there and think it does the job pretty well by itself.
The top of the bark strips are now darker than what you can see here, i was getting annoyed that some sections of the top planes are noticeably brighter where the light falls on them, but its looking better now that i've darkened it.
I havn't yet added any paint splatters to this yet, im not 100% sure they're necessary and wanted to get ure opinion first.
And finally im not quite sure whats happening on the right offshoot but it looks like the texture overlaps in a couple of places, not sure what this is cuz its not the UV's - tis something i still need to go back over.
And the right offshoot is all floaty.
 Next the wheelbarrow.
If this looks a little desaturated its because...it is. I only had one light on this so when i rendered it it came out really underexposed, so i brightened it with levels.
Found myself clueless when it came to the colouring of this so i just applied similar colours to what we had been using on the large watering can.
I've also somehow managed to apply the splatter paints on every service except the ones that we're going to be seeing. so i need to go back over and do more.
Also the wheel on this model looks somewhat...sunk. Do you want me to leave it like this or shall i raise it up a bit?
 Basically tried to make this look as campish as possible...Too much?
Am going to get into uni for about 1ish tommorow to pick up these shrubs and leaves and will hopefully get them done by midday weds. After that i think im gonna spend a few days animating - going back and finishing the scenes ive started.
And i plan to start some test renders using shot 4 with textured Macho in textured enviroment over the weekend, unless im needed somewhere else.
As always thoughts and feedback.
Wasted quite alot of time today playing aorund with lights wondering why my renders were contantly overexposing before realizeing the blending mode of my occlusion was set to overlay....dipstick.
Got the stump through off Sarah on saturday and found that although the stump had been UV'd properly, the bark that raps around the outside of of the stump had only been auto mapped, and so had to waste half a day mapping that out properly. But thats done now and the textures are created and just need feedback.
 Right comments on this. Firstly on this particular render there is no bump map, tis something that i've started working on though, for the bark in particular it'll probably only be slight cuz i really quite like the texture thats on there and think it does the job pretty well by itself.
The top of the bark strips are now darker than what you can see here, i was getting annoyed that some sections of the top planes are noticeably brighter where the light falls on them, but its looking better now that i've darkened it.
I havn't yet added any paint splatters to this yet, im not 100% sure they're necessary and wanted to get ure opinion first.
And finally im not quite sure whats happening on the right offshoot but it looks like the texture overlaps in a couple of places, not sure what this is cuz its not the UV's - tis something i still need to go back over.
And the right offshoot is all floaty.
 Next the wheelbarrow.
If this looks a little desaturated its because...it is. I only had one light on this so when i rendered it it came out really underexposed, so i brightened it with levels.
Found myself clueless when it came to the colouring of this so i just applied similar colours to what we had been using on the large watering can.
I've also somehow managed to apply the splatter paints on every service except the ones that we're going to be seeing. so i need to go back over and do more.
Also the wheel on this model looks somewhat...sunk. Do you want me to leave it like this or shall i raise it up a bit?
 Basically tried to make this look as campish as possible...Too much?
Am going to get into uni for about 1ish tommorow to pick up these shrubs and leaves and will hopefully get them done by midday weds. After that i think im gonna spend a few days animating - going back and finishing the scenes ive started.
And i plan to start some test renders using shot 4 with textured Macho in textured enviroment over the weekend, unless im needed somewhere else.
As always thoughts and feedback.
Friday, 16 April 2010
Garden
 This is a render from yesterday.
Note: theres is only one huge spotlight in this scene.
Im pretty much sitting with a bunch of Gruffalo screencaps infront of me trying to capture the same colour palette as they used, seeing as its been our biggest influence on this project.
Im really quite pleased with the fences - they've turned out better than i thought they would.
I've still got to bump map the grass and the dirt and im a little worried about the edging where the grass and dirt meet, its too harsh and makes the grass look like water. I thought about maybe a short level of grass skirting around the edge, but this would be quite a lengthy a boring thing to do so i dunno. I might just see if indenting the edge makes a difference, it seems to have worked were the fences and dirt meet.
Annoyingly over the last day or so an couple of files have corrupted and i need some stuff -
UV'd Flowepots + Wheelbarrow (got off Sarah this morning)
UV''d Tree Stump (wasn't with the rest of the props)
All the bushes and leaves.
Mushrooms (apparently still being UV's)
Texturing
Right, am taking a week off of the animating to get some texturing done.
I spent a coupla of day s fiddling around with macho textures and getting them done using Maya's Fast skin. I really quite like maya fast skin and was planning to push it useage as much as i could for this project, but during mondays meeting with Sarah and Dan it was decided that using the fast skin
to texture our characters wasn't really a viable option. Although it looks really good its a very fiddly process that isnt very user friendly so its getting dropped so we can spend more time perfecting other elements, sometimes its a real pain that we don't have more people working full time on Gnomes, ah well.
I spent a coupla of day s fiddling around with macho textures and getting them done using Maya's Fast skin.
 I really quite like maya fast skin and was planning to push it useage as much as i could for this project, but during mondays meeting with Sarah and Dan it was decided that using the fast skin
to texture our characters wasn't really a viable option. Although it looks really good its a very fiddly process that isnt very user friendly so its getting dropped so we can spend more time perfecting other elements, sometimes its a real pain that we don't have more people working full time on Gnomes, ah well.
Friday, 9 April 2010
As requested
Right this is shot 32 as of 12.15(am) friday morning.
Its ok-ish up until a point, the struggling to keep the weight up is working really well, but the lift from crouching needs work done to it, cuz at the mo' he just... does it, then stand stationary for about 15 frames.
I dont like the smile i have him doing at the end, it isn't expressive enough and looks generally bad and i might make the eye twitch a bit more subtle - make it look like its a small detail that supposed to go unnoticed...but still catches everyones attention.
Also need to bring the pot down further on his head before he starts lifting to add more weight cuz it looks too floaty.
Things to note -
Having him holding the flowerpot above his head in both hands is a right pain in the arse, its easy enough parenting the pot to one hand but matching the movement with the other arm has led to no end of grief, and has taken a ridiculous amount of time to get looking only half decent.
The flowerpot was WWWAAAAYYYYY too small and i've had to scale it up to fit Macho inside...should be okay though...i hope....
The flowerpot crash looks REALLY bad without the sound or dust, i did add some camera shake to it at one point, but then realized that if we're gonna be adding dust effects in AE then it wouldnt be possible to have the camera shaking, so i got rid of it...and its boring again
Found a couple of problems with the blendshapes as well. Namely that he doesn't like to look up with his eyes - simple solution is to not have him look up. I wouldn't say that the animation has suffered any and am not sure whether its worth taking the time to fix or just keep cracking on until its a proper issue.
Lemme know your thoughts on the animation. And also lemme know if we're gonna break into uni on Sun to get some texturing done (i've studied the layout and think i've found away around the security alarm).
Tuesday, 6 April 2010
The first incomplete animations.
Both of these are works in progress.
Animating has only in the last two days started running relatively smoothly. Being the first piece that I've animated in about a year i took me a couple of days to remind myself on how things worked - "Ah! The Graph Editor! I remember that."
The first couple of pieces i created were truly terrible so this is about the 4th time I've animated scene 3 and i got a bit bored of doing it, so i decided to apply my now refreshed (though limited) animation knowledge to one of the other scenes and go back to scene 3 in a couple of days.
I've started using video referance properly for the first time and i can't believe that i havn't used it before. Its been immensly helpful with posing and arcs, and in real life you do things thats you would never think to add off the top of your head.
For example when i was filming myself weight lifting for referance everytime before i lifted the weights i would do something to loosen up my muscles, whether it was shaking my hands off or stretching my neck to one side it was a involuntary movement that i never would have clocked to add to the scene. These little details - although a pain to add in - are what makes good animation and really brings your characters to life.
Although this did lead me down the side route of being overly ambitious, I ended up thumbnailing and trying to add all kinds of slouches, jumps and stretchy/yawn hybrids to the movement until 2 days later it dawned on me that i only had about 110 frames to animate the scene and far too much happening. So big cut back and now he just has a quick arm shake to loosen up as he's moving towards his rocks (don't look for it, it ain't done yet.)
This shot (4) is alot closer to completion, i've got a couple more elements to add to it before i feel its been done to a reasonable standard, no more than 2 hours work, spoke to Dan Dahli today and he commented that the timings need to be a bit more uneven to add weight to the movement - something i completely agree with - but due to the ever pressing time restrictions i'm going to leave this for today and make a start on shot 32, which is one of the harder shots and is probably going to need some more time spent on it.
Edit - Just noticed the timing on his bounce (shot4) are off kilter to the weight lifiing....bugger.
Wednesday, 31 March 2010

Righty....2
Just got back from a sound meeting with Pip and Sarah and before i started animating, i thought it would be better to do a quick summary of the last couple of days.
Painting weights was a quicker process than i thought it would be but it took me longer to finish than i thought it would. I'm really quite pleased with how alot of it has come out, the body im particulaly pleased with because by adding extra bones to distribute the weight in his face and belly we have managed to achieve no rippling in his mesh when he moves around despite the fact that he's quite a chunky character.
 If you dont know what im talking about when I say rippling have a look at my model from the second year - Bungo
 You see how the belly is folding in on itself underneath his chest, when this is moving it looks REALLY bad, the character looks more like their made out of taffy than actual flesh (or in Machos case rock).
There are a couple of areas that im not entirely confident about, the arms and the legs required (as far as i could tell) minimal intervention from me after the smooth bind, so i expect that i'll start spotting problems when im animating, this shouldnt be too much of an issue though because with painting weights you can fix it on the model there and then.
* * * * * *
I wasted much of monday trying find a way to get multiple blendshapes setup on a 2d facial control panel. The only answer i found was in the book Stop Staring, however they used quite a lengthy process that revolved around their own mel script tools which for some reason refused to work in 2010.
After a quick whine to Sarah, she collared Edgely who was kind enough to share his prcoess using set driven keys, which worked like a dream, after that it only took me a couple of hours to get the facial control panel setup. So cheers for that Edge.
 There were a couple of errors with the blendshapes not merging together as well as they should be and i've spent a couple of hours cleaning them up as best i can, but their still not perfect. However the deformations are barely noticeable and are only occuring when the blendshapes are at their most extreme (positions that probably arn't going to be used) , so for the sake of time management im going to leave them for the time being and see how we get on.
I'm going to be keeping a VERY close eye on them though and if their causing too much trouble its something that will need to be adressed, but we shall see.
Friday, 26 March 2010
Skinning Update
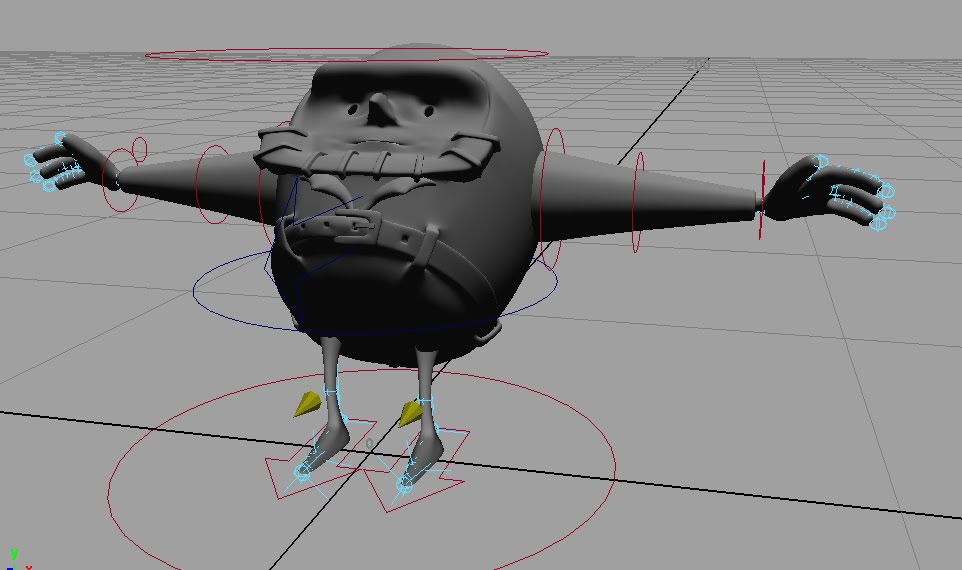
There was only two changes i had to make to Sarahs rig and only in the body the arms and legs are fine (the hands set driven keys are AWESOME!). I added two more joints to distribute the weight on the face and belly to help keep their shape as he's turning and stretching and reshaped the "ribs" he was given (looking back maybe not nesessary but it make things simpler).
 The second thing was more of an error than anything. For some reason on the file i recieved the IK spline put in his spine was inverted. So when you told him to lean forward he would lean back.
 There was also an issue of the skin constraints relying on the global co-oridnates which prevented the creation of a master control. And unfortunatly in the end i figured it would be generally easier to simply get rid of it - if necessary we can add one back in once the skin is weighted.
All that said the rig layout is incredibly astute and makes my life of weighting it a hell of alot easier. Got most of the weighting done on thurs and am now spending friday simply fine tuning it.
 You can really see it too well but that is body twist. I've also got the face setup so it can move ontop of the body slightly so if we need to emphasize him looking at something, sighing, straining etc we can use this subtly to emphasize the movement.


I just need to level out the weights a bit more so it can squash a little more without pinching, do a bit more work on his collar(i thought it was working yesterday but it clearly isnt) go over his arms and legs with a fine tooth comb and make sure they're working well and then hes pretty much done. All that needs doing after that is to make a few changes to the blendshapes and create a facial control panel and hes ready for animating.
You may also notice that a couple of the nurbs circles don't follow the rig. This is because of some reason i can't get the parent script to work for me, all it does is create a dublicate nurbs circle with both circles are parented to each other, instead of parented to the rig.
 The second thing was more of an error than anything. For some reason on the file i recieved the IK spline put in his spine was inverted. So when you told him to lean forward he would lean back.
 There was also an issue of the skin constraints relying on the global co-oridnates which prevented the creation of a master control. And unfortunatly in the end i figured it would be generally easier to simply get rid of it - if necessary we can add one back in once the skin is weighted.
All that said the rig layout is incredibly astute and makes my life of weighting it a hell of alot easier. Got most of the weighting done on thurs and am now spending friday simply fine tuning it.
 You can really see it too well but that is body twist. I've also got the face setup so it can move ontop of the body slightly so if we need to emphasize him looking at something, sighing, straining etc we can use this subtly to emphasize the movement.

I just need to level out the weights a bit more so it can squash a little more without pinching, do a bit more work on his collar(i thought it was working yesterday but it clearly isnt) go over his arms and legs with a fine tooth comb and make sure they're working well and then hes pretty much done. All that needs doing after that is to make a few changes to the blendshapes and create a facial control panel and hes ready for animating.
You may also notice that a couple of the nurbs circles don't follow the rig. This is because of some reason i can't get the parent script to work for me, all it does is create a dublicate nurbs circle with both circles are parented to each other, instead of parented to the rig.
Wednesday, 24 March 2010

Update....once again its been a while.
Right lets recap on the problem we was having with our textures, and that they were stretching. we had a short meeting with Alex Hulse and he agreed that whilst projecting the textures was a solution to the problem it wasnt one that he recommended because the textures on the face would appear to be free flosting and any movement would thus look horribly unnatural. So he advised us to simply add more geometry to our model and space out the verts so that there was less stretching on the textures, which is the process we have adapted and so far its working well, so cheers for that Alex.
I've scaled the UV textures, and done some layout and colour tests on Macho and thats all sorted now, so its pretty much just need to create Macho's final textures and apply them, which hopefully wont take too long.
Aaaaand i've just completed Macho's blendshapes.
 37 in all, and most of that is down to his eyebrow which has 14 blendshapes to itself.
Going to spend a couple of hours now doing a quick test animation to see that they are working well together and highlight any changes that need to be made, will try to get that done today and have it uploaded either today or tommorow.
Tuesday, 9 March 2010
Right i have a working solution...but it isnt going to be fun
I'm about mid way through testing this process and its working so far.
Basically we create a kind of frankenstein monsters out of our gnomes using textures.
Theres two ways in which you can texture something...Using UV mapping or Projecting.
We all know what UV mapping is, Projecting is simply that, you create a placed3d texture which instead of laying ontop of the mesh of you model projects onto it.
Because projected textures are...projected and arn't part of the model you can move the verts around as much as you please and the textures don't move.
So the way that we get it working is we have the blendshaped sections of our models as projected textures and the rest of it UV'ed.
IE Its in no way ideal and i havnt tested to see if its going to work well - unless the textures are done pretty perfectly it might be glaringly obvious that they done match...and im not sure how we're goin to line up the projection with the UV's...so alot of plotholes(the more you look at it the more you see) If another solution comes up we'll probs drop this idea...but its something at least.
Basically we create a kind of frankenstein monsters out of our gnomes using textures.
Theres two ways in which you can texture something...Using UV mapping or Projecting.
We all know what UV mapping is, Projecting is simply that, you create a placed3d texture which instead of laying ontop of the mesh of you model projects onto it.
Because projected textures are...projected and arn't part of the model you can move the verts around as much as you please and the textures don't move.
So the way that we get it working is we have the blendshaped sections of our models as projected textures and the rest of it UV'ed.
IE
 Its in no way ideal and i havnt tested to see if its going to work well - unless the textures are done pretty perfectly it might be glaringly obvious that they done match...and im not sure how we're goin to line up the projection with the UV's...so alot of plotholes(the more you look at it the more you see) If another solution comes up we'll probs drop this idea...but its something at least.
Monday, 8 March 2010
Update
Right, been working on this problem for about 6 hours now.....and I've gotten no-where.
I have proved several things to myself though:
Its impossible to remove a verts influence on a UV.
Its impossible for a blend-shapes UV's to effect the Primary model.
Projecting a texture onto the character mesh isn't going to work. (which throws doubt into animated textures for eyebrows)
Animating the UV's isn't going to work
Transferring UV attributes from an unmodified model isn't going to work
I'm really stumped by this and can't think or find any other leads as too what to do next.
1 hour later :OK there IS more thing to try that I've just thought of using blend colour nodes but if that doesn't work i really am stumped. Will try it in 'ze mornin
Horrible glaring problem
Our eyes don't work with the textures...You remeber the test i did with the eyebrows today (the one where the blendshape was effecting not only the painted brow but the surrounding skin) basically the same effect happens when you create blendshapes on our eyes. A quick and crude test but you can see the problem.
We could fix this is if we could somehow lock the UV co'ordinates(around the eye) or somehow detach their connection from the verts (not even sure if this is possible).
Really not sure what else to suggest because its not only the texture thats effected but the bump map as well. So even if we (god forbid) were to have their faces as one stagnant skin colour the bump would still deform.
Really stumped....
Any ideas???
 A quick and crude test but you can see the problem.
We could fix this is if we could somehow lock the UV co'ordinates(around the eye) or somehow detach their connection from the verts (not even sure if this is possible).
Really not sure what else to suggest because its not only the texture thats effected but the bump map as well. So even if we (god forbid) were to have their faces as one stagnant skin colour the bump would still deform.
Really stumped....
Any ideas???
I'm either stupid or...not
A probably stupid scenario but one that has been bothering me for a while.
You can blendshape using groups! I think i remember Sarah questioning whether it was possible for Girls hood and it is. I was origionally gonna combine the inside of his mouth with the rest of geometry (the way i've done it in the past - cuz im either misinformed or just plain thick) but this is a real bitch to work with cuz it makes it near enough impossible to select anything without highlighting a whole bunch of verts you dont want, so takes aagggeeesss to do anything.
Couple of things to note though:
When duplicating the primary object for shaping you have to select the group its assigned to, rather than the mesh.
Something i did wrong:
You gotta name all of the shapes in your primary group mesh - before you duplicate it for blendshaping - in the outliner cuz otherwise the computer likes to start naming things itself (and boy can it be creative!) If the shape names of the objects your trying to blend don't match nothing is gonna happen. Plus it adds to the general Maya organization that we all seem to lack.

Something else i did wrong:
Now lets say you've created the group blendshapes and you wanna move the one of the shapes around (in this instance teeth). What i did at first was select the geometry of the teeth hit the trusty old "W" and move it up. Rather proudly i then created the blendshape and tested it only to have Maya stare back blanky at me.
When you make a blendshape Maya ignores the positions of your shapes, which is why you can move your blendshape meshs all over the place and not have it effect the primary, Blendshapes only effects changes in the vertex's (vertexi?) which sounds really obvious but is (according to my expieriance) really easy to overlook.
So instead of just moving the shape you have to select all of the shapes vertex's and move them.
 Hope this helps a little, probably didn't, but hey.
Wednesday, 24 February 2010
Hero, a work in progress
We have a small (and by small i mean HUGE!!!) problim.
Hero looks terrible with eyebrows!!!
 This makes my eyes sting.
I really dont know what to do about it. Both these models are roughly the same stage and the only noteable difference is the eyebrows but the one on the left looks way better (even though its a work in progress and still needs tonnes done to it) I dont think remodeling the brows will make any difference either, the only solution in can think of at the moment is too have brows kinda like girl gnome and then emphasize the expression by using the lip of the cowl, but i dunno, we really need to sit down and have a brainstorm session.
Things that still need work on Hero-
His face is too flat and has got rippling happening on it that need sorting.
Beard needs finishing (is it working?)
Belt needs attaching - its modeled and i've made it a bit different from Machos by fleshing out the buckle.
Belt hoops need adjusting and attaching.
Need to sort his belly out (you can really see it here but hes somehow aquired a beer gut?!?)
Need to do new set of teeth cuz Macho's are too chunky.
Probably something else but i cant think of it right now...possiby make his hat taller...
In other news, adding more texture to Macho should be easy enough we just need to put another bump map on him which was only cracks+chips in his surface.
Today was probably the last day im gonna spend on Gnomes, tis gonna be dissertation from here on in.
Tuesday, 23 February 2010
Quick Texture Test
Got bored of writing dissertation and started looking at blogs and saw what Lewis and Tom were doing on the skinning of their characters so i thought i would see if we could devlop that a bit and apply it to our Gnomes.
Its only a pretty quick test to see if it was a process we could use and i'm quite pleased with the way its come out.
 Right i think this is looking surprisingly good considering its the texture Sarah gave me colourized red and then a greyscale pic of some concrete applied as a bump and an occlusion. The sub surface scattering really adds alot more to the texture. With the proper textures and a bump map that ive actually spent some time on, shadows etc I think we could get this looking really good.
Heros still in the works - having a little trouble adding subdivs to his body without getting major pinching in his hat.
Edit: Uploading this JPEG onto the internet has lost a noticeable amount of quality.
Wednesday, 17 February 2010
Kid Killer McGee!
Cuz i forgot my memory stick today i couldnt get on with modelling the snail, however this allowed me to finish my rigging tests and im now relativly confident that all areas should work, the arm joint leaving the mesh works on Machos arms, Machos brow is gonna have 6(ish) seperate sections that will move independantly of each other and i found a youtube tut on creating a stretch IK(dave then came in and spoke about he created one for polished off and what he was descibing seemed to match the vid) and i managed to get some other modeling done, so quite a good day today.
Last coupla days ive got Macho UV'd, i need to go back over and make some changes but for all intents and purposes he's done and ready for rigging, and i'm nearly done modeling the snail who has been named Kid Killer McGee


He's still a work in progress, need to sort out the shell in a couple of places and pull it back under the shell-lip ive given him and bring the start of it down a bit so that the shell looks more connected to his body instead of just set ontop of it....reading back over it that last sentance doenst make alot sense but i cant think of another way to word it...i know what i mean.
Monday, 8 February 2010
2 comps in as many weeks
Right basically my laptop has caught alzheimers and corrupted, i havnt lost anything on the project because ive got all my gnomes work backed up in about 3 places but i still lost loads of my personal stuff and its hindered me quite badly this weekend. So im not best pleased atm. Ive still got my PC (which is what i work on at home anyway) but it means that i can't work on maya in the animation room cuz for some reason maya doesnt work on my uni profile in the animation room (sounds weird but trust me it doesnt).
EDIT: Have JUST got maya working on my dads laptop which is exactly the same as my old one so i'll be using that for the time being in uni.
Spent the last couple of days UV mapping - something which up until now i have been able to avoid to the best of my ability. Im not gonna lie its been pretty tuff going, and a number of times i've had to get up and walk away from it out of frustration, but we're making progress.

Ive still got loads to do on it and its full of errors but we're getting somewhere even if it is at a snails pace.
Noticed a couple of horrible glaring errors with the textures me and Sarah created from scratch involving the canvas underlay - it makes the texture look like a patchwork quilt.
Sarahs texture:

Matts Texture- He looks knitted.
 This is something that is going to need adressing but im probably gonna leave all further texture tests till after ive completly got him UV'd - i just want to get it done and out the way.
Also did some really quick rock texture tests (think 30 mins) but am horrified with the results because they're terrible.

SHIELD YOUR EYES!!!
Yeh so gonna get on with the UV mapping and get it out of the way.
Tuesday, 2 February 2010
Reminds me of My childhood.
A wee bit off topic but something i'd like to show, One of the pieces nominated for an animated short Oscar.
Lets hear a shout out for excentric grannies everywhere.
Lovin the hair on both characters, and the way that the evil witch flies with the walking frame.
Lets hear a shout out for excentric grannies everywhere.
Lovin the hair on both characters, and the way that the evil witch flies with the walking frame.
Looksie
The turntable of Macho, gives a much better view of what the nose looks like.
And the texture without the tea stain layer applied.

And the texture without the tea stain layer applied.

Monday, 1 February 2010
More Nose
We'll get there.


Righty this is how the nose is on the model sheets, and im not sure whether the mesh will support the nose going any thinner, i'll render out a quick turntable of the face tommorow morning so you can see it more dimensionally then get on with the blendshape tests.


Righty this is how the nose is on the model sheets, and im not sure whether the mesh will support the nose going any thinner, i'll render out a quick turntable of the face tommorow morning so you can see it more dimensionally then get on with the blendshape tests.
Back to the texures.
Righty, playing with textures. We're now reaching a stage where we can begin to start thinking about texturing bits and pieces and theres an issue that i've been putting off for a little while now, we've been using one master texture for everything we've done thus far, and i do mean everything. All of my tests have been done with this texture all, the colour scriptings been done with this one texture, all the character colour tests have been done with this one texture.
The problm lies in that its only a small texture (800x800 - the grass tests i did were about the limit it can be used for) and we cant apply it to everything cuz it'd look ridiculously reptitive.
I've done quite a bit of searching and i can find another texture thats going to be able to match this one...and so ffar i got nothing, so methinks we're gonna have to make our own.
This is the texture i used for the watering can. 2 layers - base texture and brush overlay

Spent about an hour or so this afternoon just playing with making something on par with how the master texture looks. The main layer of the texture is some coffee stains on paper then ive layered it with photoshop brushes, canvas texture and underlay colour.
 Whatcha think, i quite like it but its too busy.
Its a huge texture (look at this texture at its full scale, this is a quarter of it) so we can adapt it easily enough.
Lemme know ure thoughts - back to Macho.

Friday, 29 January 2010
... 4hours later.
 Trying to get the beard working better. Whatcha think.
It still needs work and has screwed up the model in a few small spots which i need to go back over and fix but want feedback before i do anything else.
Took about an hour of experimenting before i worked out a way of extruding the beard without mucking up the mesh, turned out be a similar process to what i used to get the holes in the belt.
As i said it still needs work but let me know if i'm on the right track.
And yes i've still got to fix his nose.
Friday, 22 January 2010
Are we done....? I think we may be done...


 I think he's done! Just need the two thumbs up and i'll crack on and start his UVing.
Wednesday, 20 January 2010
Righty, lets get up to date.
With a significantly lighter bank account i can happily state that that my new computer is built and its INCREDIBLY powerful. So (even though its early days) rendering shouldn't be a problem.
On gnomes i've spent most of my time recently on modeling Macho, I was going to be modeling Hero as well but Yaniv has taken it off of my hands now so i can really focus on Macho.
 There's been loads of tweaking done on him and i think he's nearing completion. I need to redo his collar using the extrude tool, sort out the edging around his face and do more to his belt and then i think that'll be it. Going to focus on my disertation tonight and then do more on Macho tommorow evening, get it checked by Sarah on fri and then hopefully start UVing him over the weekend.
Machos been modeled differently to how i would usually model a character, In the past i have had the main mesh made out of several different pieces but for this i was told to model all of the main body out of one shape. Its takes longer than it would usually to do it but the end result is much better.
A bit of a short post but i really have only spent my time on this model so i havnt got anything else to show.
Subscribe to:
Posts (Atom)
